
I Build My First Boat
This is Punga, a Spindrift 10, my first boatbuilding project and the new tender to the boat I live on, as well the biggest toy aboard. Her name is a tribute to the heavenly place in which she was built: Punga is the Maori word for the silver tree fern (the motif of New Zealand), and she was built amongst dear friends on Punga Grove Avenue, Whangarei, New Zealand.

I painted fish inside her with non-skid paint to save us from slips.

She carries a small outboard motor with ease,

She rows beautifully,

And she also sails.

She takes us on swimming adventures, and even has a tiny ladder to climb back aboard at the transom.

I made an outhaul (clothesline) anchoring system for her, meaning that we can anchor her off a beach, row to the beach, then ‘clothesline’ her back out to her anchor on a circular line so she sits in safe water (as opposed to hauling her up the beach).

Every inch of her, from building the rig and constructing her hull to sewing the sail and painting her, has been my work alone. This is not to say I did not have help and support: one friend lent me her shed space, another friend gave me the key to his woodwork shop and access to all the tools I could dream of, another donated the metal fittings which join her together, saw horses came from someone else to make my work table, and enthusiasm and interest came to buoy me up from many quarters. She represents about five months of work, and (leaving out a lot) below is the story of how she came into being and enjoyed her first moments in the water.
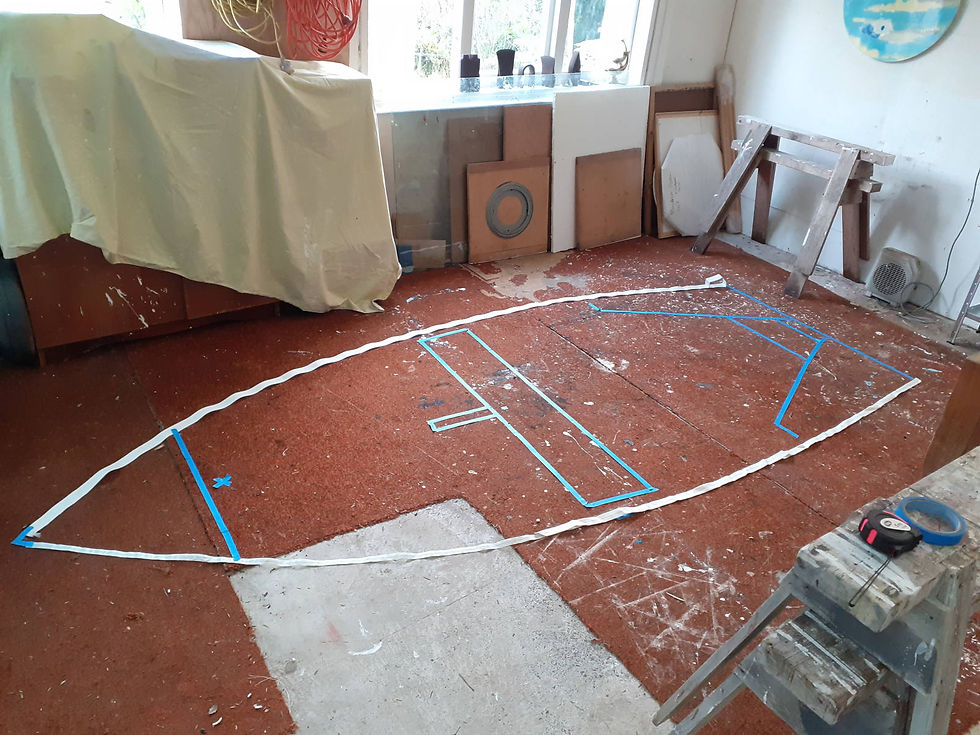
At first she was very difficult to imagine, but I tried to think about her size and shape.
Her hull is made from marine plywood, but plywood sheets do not come in long enough sheets to build a boat of this size, so the sheets of ply need to be scarfed together by planing the ends down to a very shallow slope and then gluing them together. This is four sheets of 6mm ply on top of one another.


Then 'lofting' can begin: marking out her component parts from the A3 paper plans.

And soon she looks like a flat-pack dinghy kit!

Using yellow cedar for her timber parts, the transom begins to take shape.

The two nesting bulkheads are laminated and prepared.

The breasthook and quarter-knees are lovingly shaped.

The construction of the hull begins by laying the two panels of one half of the hull against their counterparts to create perfect symmetry. Then each pair is glassed separately for the first 20cm or so at the bow.

Then the fittings to join her two hull parts at the nesting bulkheads come into the workshop, marvels of simple engineering.

It takes some while to make them work with the bulkheads to ensure that everything will align properly when she is assembled into a whole boat from her two parts each time.

Punga is made by the 'stitch and glue' technique, meaning that small holes are drilled along all the joining edges and she is wired together to obtain her shape. The seams are then glued with epoxy and then the wires are removed. In this picture her central seam is already wired and I am beginning to work backwards from the bow wiring and shaping along her chines.

The paired nesting bulkheads are inserted.

The transom and forward bulkhead are wired into place, the breasthook is screwed in and, all of a sudden, she is a boat!

Before making the final adjustments to wiring her shape, the gunwales are put in place. This is hard work, and one of the only parts of the construction which requires two pairs of hands: on each side of the boat three slippery, slithery, epoxy-covered strips of timber are forced to bend every way possible at the same time and clamped in position as we go, working backwards from the bow. No imaginable number of clamps could have been enough, and a good number of temporary screws were conscripted.

When the glue is dry and she is sanded off, she looks really wonderful for the first time.

Now her shape is finalised, gluing the seams between the wire ties can begin.

During drying times, and in between the main course of the work, other smaller jobs fall into place, like laminating and shaping the rudder cheeks and rudder.

When the glue is dry, it is safe to remove the wire ties and make neat fillets of glue all the way along her seams, reinforcing them with fibreglass tape, especially at the nesting bulkheads where she will take a lot of strain when sailing.

I make sure to be alone and without distraction when I take the bold step of cutting her in half between the two nesting bulkheads. It feels very counterintuitive!

It is over quickly, the job is neat and successful and she nests together in two pieces very comfortably.

Now I fit the foredeck, which (inside) means constructing the kingplank which reinforces the mast collar, which is also drilled out. The foredeck is not actually attached yet because inside the flotation chambers must be sealed and painted before they are closed permanently.

Likewise, the aft flotation chambers are construction and fitted, but not closed.

Smaller jobs like laminating the mast step and mast plug take time as well.

Things are really coming together: the thwart is fitted, which must go over the nested bulkheads, and construction begins of the centreboard trunk.

The mast step is positioned relative to the mast collar with some inventive use of a spirit level and various other props, in hopes that the mast will be vertical when Punga at last sits in the water.

The aft seat also needs to be fitted with its rests to sit in, which place it over the ports to the aft flotation chambers.

All the flotation chambers are now sealed, painted and closed, so the work of sealing of the hull really starts. Firstly, the entire outside of the boat is covered in a continuous sheet of fibreglass, including the outside face of the nesting bulkheads.

The taped inside seams are all faired.

And after many hours of sanding, the inside of the hull is sealed entirely with three coats of epoxy resin.

The outside of the hull is faired smooth as well. The centrboard trunk has been finalised, so it is time to cut a hole in the bottom of Punga to carry the centreboard.

The rudder assembly and tiller can be dry-fitted to the transom to locate the gudgens and pintels.

Three more coats of epoxy over the whole outside of the lovely smooth hull, and she then has the keel fitted, which really makes me think of her moving in the water.

Scraps of plywood and timber are invented into a small additional seat which also acts as a 'plug' for the centreboard trunk to prevent water from come up through this hole when she is not being sailed and is moving fast, for instance, if she were being towed (which, inevitably she will be).

This is what the seat/centreboard trunk 'plug' looks like from underneath, just next to the keel. The water should flow quite nicely here still.

The 5.1m mast is made from three aluminium tubes which must slot into one another. Fibreglass tape makes collars around the two upper tubes to prevent them from sliding down inside their lower neighbour.

The remainder of the yellow cedar is ripped into thin strips, each one turned 90 degrees and then relaminated together, to prevent warping.

The centreboard is shaped and a hole is cut in it where it will sit inside the trunk. In theory this is to reduce weight, but I think it just has a cool factor.

When everything really looks good, the first coat of primer goes on the inside.

And the outside. In reality, putting the first paint on her shows all sorts of finishing work which needs further work before continuing.

But eventually she is dressed with some nice, thick coats of undercoat.

The best quality two-part paints are used, and there has already been a lot of time spent wearing a mask when the first yellow makes its appearance.

Yellow is a great colour for a boat, but the colour itself does not cover very easily. This means that Punga needs five coats of paint before she looks smart. Here she has only two.

After her fifth coat she can be turned over and painted blue inside.

When looking at designs and trying to fit something to the needs of our 'big boat', we considered a one-piece dinghy in which I could insert a clear panel as part of the hull to allow light through when it was stored over the forward hatch (read, glass-bottomed boat). This spawned the idea of making a fishy interior, which eventually became the non-skid needed for safety.

Three colours are used for the non-skid fish, which are all different ratio combinations of the outside and the inside paints mixed together.

Finding some kind of fendering for the gunwales was a thankless task, and in the end I make Punga some custom fendering myself using a couple of different types of closed cell foam, canvas, leather on the aft corners and the bow, all put together with a sewing machine and ingenuity.

It was time to name her. She also has a koru painted on the port side of her transom (lifting from Wikipedia: the spiral Maori design based on the appearance of a new unfurling punga (silver fern) frond. It is an integral symbol in Maori art, where it symbolises new life, growth, strength and peace. Its shape conveys the idea of perpetual movement, while the inner coil suggests returning to the point of origin).

Punga is ready to launch, but the days before the big day are filled with the preparation for her adventurous days to come in the future. The rig is mainly finished and the small hardware is attached to the boom.

The sewing machine makes a grand appearance and Punga's sail comes into being.

Punga has her first sniff of the ocean when we take her onto the dock.

We launch her with flowers.

And everyone has a little row.

Even me.

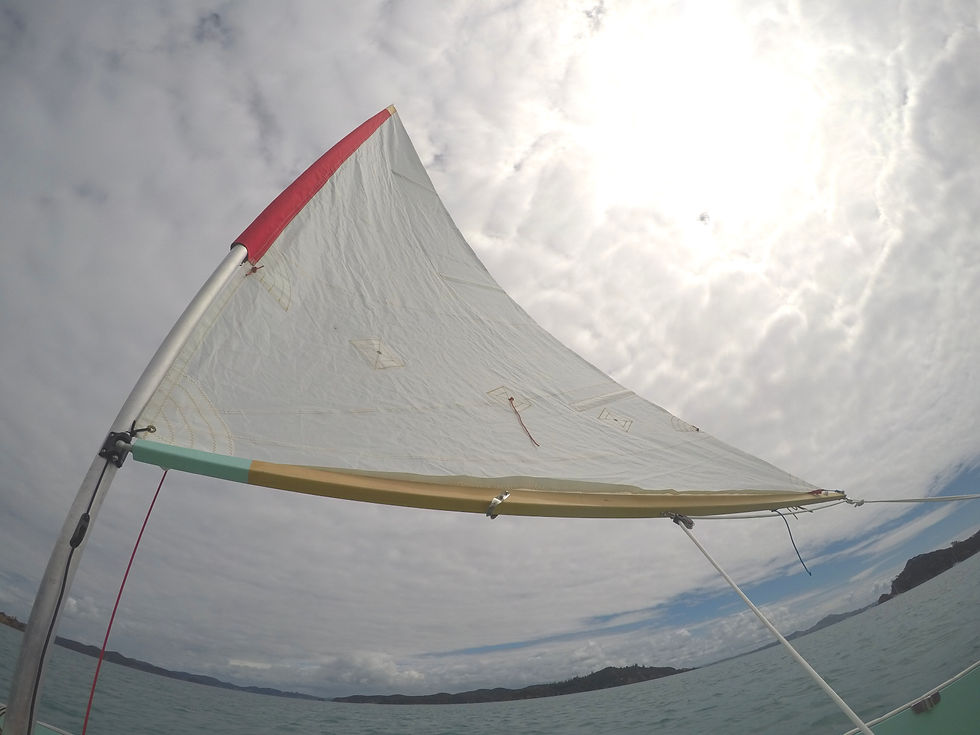
We are finally able to leave the marina now that we have our new tender. It is in one of our favourite places, Whangmumu, where the sail is finally unfurled and the rig assembled.

In the lightest of winds I take her out and, like a miracle, everything basically works.


Punga has had many outings in the last month or so since then, and various tweaks have improved her. We're still learning, and looking forward to many years of fun and functionality from her.


And the latest discovery is that after heavy rain when she fills with water…

Punga’s two halves can be used for laundry, forward for washing, and aft to rinse!


Comments